Motorola droid ultra xt1080 Verizon root


Do it at your own risk me or any developer isnt here to answer your questions after bricking this device watch whole tutorial file i upload it on my page download it from here coz this developer links are almost dead
Download files for root
procedure for rooting
Watch the tutorial

Download DOOGEE X5 MT6580 Firmware

    Below is the direct link to download the DOOGEE X5 MT6580 Firmware stock ROM (flash file) this Firmware can be use to Flash Unbrick or Upgrade DOOGEE X5 MT6580
Take a Backup of your personal data before flashing or installing the firmware on your smartphone.
As this helps you to recover the personal data whenever any thing wrong happen.


HOW TO FLASH DOOGEE X5 MT6580?

      The below tutorial only works with the Stock firmware or Custom Rom which comes with the Scatter file in it (basically Mediatek devices).
Take a backup of your important data before using the Smart Phone Flash Tool as because during the flashing process your personal data will be removed permanently.
Your Android Smartphone should have at-least 40-50 percent of battery to perform the Flashing Process.
Download and extract the stock firmware on your computer.

After extracting you will find the SP Flash Tool, Driver and instruction manual.

Install the USB Drivers (skip if drivers are already installed).

Open the SP Flash Tool and load the Scatter File from the firmware folder.

Connect your Smartphone to the computer using the USB Driver.

Click on Upgrade / Download Button in the SP Flash Tool to Begin the Flashing.

Green Ring will appear at the end of successful Flash.

Congratulations, Now your Android Smartphone is successfully running the Stock Rom you have Downloaded.
See Detailed instruction with images On how to Use sp Flash Tool

After flashing the firmware on your Mediatek Device, you need to follow Any of the link below How to Flash / Fix Repair the IMEI on your device.
How to use MAUI META 3G to Fix Null/Invalid MTK Imei
How To Change Stubborn MTK IMEI
How To Fix/Change Mtk IMEI Without Root Access

Recommended:

You Might Also Like:

Download SP flash Tool From here
Download Spreadtrum Flashing Tool from Here


DOOGEE X5 STOCK ROM
DOOGEE X5 MT6580

Assassin’s creed: Identity

Assassin’s creed: Identity - another game in a well known series with amazing graphics and absorbing gameplay. The action takes place in Italy during the Renaissance. The mission are generated randomly, but there's also a main story line. Players are given edged weapons and an opportunity to create their own character from four available classes. The skills and abilities are various - throwing knives, armor reduction, slowing bombs, and more.\
Download   Torrent  Android 4.0 and higher. v2.5.4 [97.1 MB] [apk]
Download   Torrent  Android 4.0 and higher. v2.6.0 [99.2 MB] [apk]
Download   Torrent  Android 4.0 and higher. v2.7.0 [92.6 MB] [apk]
Download   Torrent  Android 4.1 and higher. v2.5.1 [97 MB] [apk]
Download   Torrent  Android 4.1 and higher. v2.8.2 [92.2 MB] [apk]
Game cache
The game requires cache to be downloaded. How to install the game with cache?
Path to cache: sdcard/Android/data/
Download   Torrent  Android 4.0 and higher. Кэш v2.5.4 [668.8 MB] [zip]
Download   Torrent  Android 4.0 and higher. Кэш v2.6.0 [688.1 MB] [zip]
Download   Torrent  Android 4.0 and higher. Кэш v2.7.0 [937.3 MB] [zip]
Download   Torrent  Android 4.1 and higher. Game cache. v2.8.2 [1.49 GB] [zip]

Bully: Anniversary edition

Bully: Anniversary edition - help a teenager find his place among the students of Bullworth Academy. Attend classes, take part in fights, vandalize and so on. Jimmy Hopkins, the main hero of this Android game, has to study at private boarding school. Help Jimmy spend a school year and get advantage of it. Participate in the war between school gangs. Step on the ring and knock out your opponents. Take a Y-stick to defeat hooligans. Arrange traps for students and teachers. Escape from teachers and group presidents who provide order.

Download      Torrent  Android 4.0 and higher. v1.0.0.14 [70.8 MB] [apk]

Download     Torrent   Android 4.0 and higher. v1.0.0.16 [28.7 MB] [apk]

Game cache
The game requires cache to be downloaded. How to install the game with cache?
Path to cache: sdcard/Android/obb/

Download     Torrent   Android 4.0 and higher. Game cache. v1.0.0.14 [2.74 GB] [zip]

Download     Torrent    Android 4.0 and higher. Game cache. v1.0.0.16 [1.95 GB] [zip]

Split (2017)

Three girls are kidnapped by "Dennis", one of the 23 split personalities inhabiting the body of Kevin Wendell Crumb. As they are held captive, a final personality, "The Beast", begins to materialize.

Download Wiselink Tool 2017 Version

People has been searching around for the latest version of wiselink Tool
with the help of this little Tutorial You will find your self continue using the old version of wiselnk

What is Wiselink ?
This is another tool which can be used in flashing our MediaTek MTK devices. It works basically like SP Flash Tool but can read scatter files which are either in .txt or .sca format.
Has multi port option which can flash many similar devices at same time.
OK now lets go to how to use WiseLinkTool


HOW TO CONTINUE USING THE OLD VERSION OF WISELINK TOOL?
Revert your system Date to 2016 December
An reopen it
DOne.


Recommended:
How To Create Custom Boot Logo Mtk Devices Using WiselinkTool

HOW TO USE WISELINK TOOL TO FLASH .SCA FORMAT

HOW TO USE WISELINK TOOL?
Download WiseLinkTool v4.1.0.39 or WiseLinkTool v4.6.4.44 OR WiseLinkTool v5.8.0.56

Download and install MTK USB VCOM drivers from here

Extract, install and launch by opening WiseLinkTool.exe inside installation folder

Click on Open RegCode File Navigate and select ZZZZZZZZZZZZZZZZZZZZZZZZ.key from extract folder
Click OK
Now Click on the button with ... to load scatter file (Scatter files can either be in .txt or .sca format)

Navigate and select the scatter file of the device you want to flash/unbrick or upgrade.

Tick the required partition to flash (Tick all for complete flash or upgrade)
Click Download Button and connect phone to PC
When process is complete,the phone will reboot or start charging depending on the option selected After Downloaded Tab.

Note that first boot after flash

Congrats! you have successfully flashed your device

Common Errors after flashing a device
If you have null or invalid imei number after flash, restore with mtk engineering mode app, chamelephon, SN Write Tool or mtk droid tools
If device bootloops after flash process, do a factory reset from recovery.
If screen of device divides/displays funny colours when boot up, use another ROM or Firmware

Download Colors Smart Phone Stock Firmwares


Colors SmartPhone Stock ROM / Firmware [FlashFile]


HOW TO FLASH Colors SmartPhones?
Download and extract the stock firmware on your computer.
After extracting you will find the SP Flash Tool, Driver and instruction manual.
Install the USB Drivers (skip if drivers are already installed).
Open the SP Flash Tool and load the Scatter File from the firmware folder.
Connect your Smartphone to the computer using the USB Driver.
Click on Upgrade / Download Button in the SP Flash Tool to Begin the Flashing.
Green Ring will appear at the end of successful Flash.
See Detailed instruction with images On how to Use sp Flash Tool

Recommended:
Learn How to Flash Mediatek device From Here
Download more Mediatek Firmware from here

These are Collection Of Colors Stock ROM / Firmware
Colors E10
Download

Colors E20
Download

Colors K3
Download

Colors K11
Colors_K11_MT6582_V1.2
Download

Colors_K11_MT6582_V1.4
Download

Colors K15
Download

Colors K20
Download

Colors K22
Colors_K22_V1.0
Download

Colors_K22_V1.4
Download

Colors_K22_V1.5
Download

Colors K33
Downlaod

Colors P10
Download

Colors P15
Downlaod

Colors P25
Downlaod

Colors T20
Downlaod

Colors T50
Download

Colors X11
Colors-X11
Downlaod

Colors X11 S03
Downlaod

Colors-X11-A750-M00-S06-130523
Download

Colors-X11-A750-M00-S06-AfterSales
Download

Colors X15
Colors X15
Downlaod

Colors X15 7616 (X703D) 2013-09-17 152157
Downlaod

Colors X16
Colors X16 2014-02-15-114154
Downlaod

Colors X16 2014-03-04 142557
Download

Colors X16 R15553
Downlaod

Colors X16 SC6820 2014-04-02
Downlaod

Colors X17
Colors X17 FOREIGN V1.0.0.zip
Download

Colors X17 FOREIGN V1.0.2.zip
Download

Colors X17 FOREIGN V1.0.3.zip
Downlaod

Colors X17 FOREIGN V1.0.4.zip
Downlaod

Colors X17 FOREIGN V1.0.5.zip
Downlaod

Colors X18
Downlaod

Colors X20
Colors X20 V1.0.5.zip
Downlaod

Colors X20 V1.0.6.zip
Downlaod

Colors X21
Colors_X21_20140827_102947.zip
Downlaod

Colors_X21_20140827_144224.zip
Downlaod

Colors X22
Colors_X22_WW805_V001_20131202_1355.zip
Downlaod

Colors_X22_V01_20141120_1200.zip
Download

Colors X26
Downlaod

Colors X27
Colors_X27_V007_2013-11-22.zip
Downlaod

Colors_X27_V008_2013-12-04.zip
Downlaod

Colors X28
Downlaod

Colors X30
Colors X30 V1.0.1.zip
Downlaod

Colors X30 V1.0.2.zip
Downlaod

Colors X30 V1.0.4.zip
Downlaod

Colors X30 V1.0.4 (OTA).zip
Download

Colors X32
Colors_X32_20140519-123022.zip
Download

Colors_X32_20140403_103033.zip
Downlaod

Colors_X32_MT6571_4.4.2_ALPS.KK1.MP7.V1.zip
Downlaod

Colors X33
Download

Colors X40
Colors_X40_V1
Downlaod

Colors_X40_V2
Downlaod

Colors_X40_V3
Download

Colors_X40_V4
Downlaod

Colors_X40_V5
Downlaod

Colors_X40_V6
Downlaod

Colors X40 Plus
Downlaod

Colors X45
Colors_X45_KK_V1.0.1.zip
Downlaod

Colors_X45_KK_V1.0.1_OTA.zip
Downlaod

Colors_X45_KK_V1.0.4.zip
Downlaod

Colors_X45_V1.0.6.zip
Download

Colors X46
Downlaod

Colors X47
Downlaod

Colors X50
Colors-X50-V1.0.9.zip
Download

Colors-X50-V1.1.0.zip
Downlaod

Colors X55
Colors_X55_FOREIGN_V1.0.0
Downlaod

Colors_X55_FOREIGN_V1.0.1
Download

Colors_X55_FOREIGN_V1.0.2
Download

Colors_X55_FOREIGN_V1.0.3
Download

Colors_X55_FOREIGN_V1.0.4
Download

Colors X56
Download

Colors X60
Colors_X60_V04_EN_20130412.zip
Download

Colors_X60_V05_EN_20130424.zip
Download

Colors_X60_V07_EN_20130601.zip
Download

Colors X65
Colors X65 V03 (2013-05-10).zip
Download

Colors X65 V06 (2013-06-07).zip
Download

Colors X75 Bold
Colors_X75_Bold_E820_M00-S04_14-01-11.zip
Downlaod

Colors_X75_Bold_E820_M00-S05_14-02-13.zip
Download

Colors_X75_BOLD_E820_M00_S06_14-03-31.zip
Download

Colors_X75_Bold_E820_M00-S07_14-04-09.zip
Download

Colors X80
Download

Colors X100
Colors-X100-V5.zip
Download

Colors_X100_V6_WBYW201TE_0101_T1200.zip
Download

Colors X110Q
Colors_X110Q_3RD.zip
Download

Colors_X110Q_WBW5881TE_0201_T0542.zip
Download

Colors X112
Colors-X112-WBW5508TE-0303-T5710.zip
Download

Colors_X112_V4.zip
Download

Colors X113
Download

Colors X113 Plus
Download

Colors X114
Download

Colors X115
Colors_X115_V1.0.9_Wallpaper_4.2.2.zip
Download

Colors_X115_20140514_V2_04.zip
Download

Colors X116
Download

Colors X117
Colors_X117_SW02_20150320_193438_KK.zip
Downlaod

Colors_X117_SW01_20160120_113258.zip
Downlaod

Colors_X117_SW01_20160112_102506.zip
Download

Colors X118
Download

Colors X120Q
Colors X120Q.zip
Download

Colors_X120Q_V5.zip
Download

Colors_X120Q_V6.zip
Downlaod

Colors X122
Downlaod

Colors X130 HD
Colors-X130-HD-V4.zip
Download

Colors-X130-HD-Black-MT6589.zip
Download

Colors-X130-HD-V4-Black.zip
Download

Colors-X130-HD-White-MT6589.zip
Download

Colors-X130-HD-V4-White.zip
Download

Colors X135
Download

Colors X140
Colors_X140_Final.zip
Download

Colors_X140_New.zip
Download

Colors X150
Colors_X150_Final.zip
Download

Colors_X150_WBW5885TE_0301_T5857.zip
Download

Colors X200
Colors_X200_Bold_2_New_Version.zip
Download

Colors_X200_Final.zip
Download

Colors_X200_MT6589_4.1.2_ALPS.JB.SP.V1.zip
Download

Colors X200Q
Download

Colors XFactor
Download

Colors XT701
Colors_XT701_SW_2013-04-20.zip
Download

Colors_XT701_(PD200)_SW_290513_11.zip
Doownload

Colors_XT701_SW_2013-04-20.zip
Download

Colors XT711
Colors XT711 V10.zip
Download

Colors_XT711_X06C_V10.zip
Download

Colors XT721
Downlaod

Colors XT751
Download

Colors XT801
Download

How To Remove FRP on Motorola XT1528 2017 Security


This tutorial below will show you a link an How to remove / bypass Google Account Verification FRP on Motorola XT1528 Moto E Verizon an other Motorola Phones with latest Security Patch 2016/2017

What is FRP?
Factory Reset Protection (FRP) is a security method that was designed to make sure someone can't just wipe and factory reset your phone if you've lost it or it was stolen. Starting with Android Lollipop, FRP is "standard" in vanilla Android, and most companies making our phones have implemented it in their own models.


Requirement:

PC
USB Cable
Motorola Phone With FRP Google Account Verification 

Download Section [Tool Needed].


How To Use 9jaROM Motorola  FRP Remover 2017 To Bypass Motorola XT1528?
 Setup the phone to Email An password
Press back key once, This will take you back to Motorola privacy Policy
Press and hold Any test
A share icon will Pop @ Top
Click on it
At this time you cant find Any Message, Xender icon, So select Message+
A message will pop says' "change meassge app? " select Yes an press OK
Another page will POP select Decline
A message will pop says'  "you can select another app" choose Hangouts
Another message will  says' "change meassge app? " Hangouts App will open
Click on Menu icon At the left Top
Click on settings
Choose SMS
Slect SMS enabled
Select cellular Networks
Slect Access Point Names
Click on search icon
an search for about
THIS IS THE TIPS 
about link may not Appear in the search result
wait for 14minite 14seconds before it can show
Now click on about when it show up
Scroll to build Number an Tap 7times
Click back botton an Goto Developer Option Enable Dubug.  
Plug in Phone to computer
An open Above Tool you downloaded in Download Section.

Also Like:
RealTerm Serial TCP Terminal V3.0.0.29 Latest Version - 2017 FRP Tool
HOW TO BYPASS FRP ON TECNO PHANTOM 6 PLUS
Final Solution: Samsung Frp 2016 Security Patch
How To Bypass Unfortunately the FRP Bypass has stopped

Smartphone root app

root master apk
root any smart phone without pc
easy compatible and safe way
root almost any device that is running on android
file type is apk install using unknown source installation
Download

Moto Root app

Moto root app for all MTP Motorola root devices i dint test it yet ..
Download root app

Download Super user

Surf's Up 2: WaveMania


The movie features WWE Superstars, providing their own voices while matching up against talking animals. It follows Cody Maverick and an infamous big wave riding crew known as The Hang 5 as they embark on a journey to a mysterious surf spot.

Split

The film depicts the surreal and epic journey of a young actress as she gets to claim her own darkness and sexuality so she can stop letting her abusive lover take advantages of it.

Download Archos 80b Xenon Firmware Stock ROM


Archos 80b Xenon Stock Firmware 

Archos 80b Xenon Quick Specs.
Brand Name
Archos

Operating System Platform
Android

Operating System
Android 4.4 KitKat

Processor and Chipset
Processor Type
Cortex A7
Processor Speed
1.30 GHz

Processor Manufacturer
ARM

Display and Graphics
Aspect Ratio

16:10
Display Screen Technology
In-plane Switching (IPS) Technology

Storage
Flash Memory Capacity
8 GB

HOW TO FLASH LENOVO A370_S110?
Download and extract the stock firmware on your computer.
After extracting you will find the SP Flash Tool, Driver and instruction manual.
Install the USB Drivers (skip if drivers are already installed).
Open the SP Flash Tool and load the Scatter File from the firmware folder.
Connect your Smartphone to the computer using the USB Driver.
Click on Upgrade / Download Button in the SP Flash Tool to Begin the Flashing.
Green Ring will appear at the end of successful Flash.
See Detailed instruction with images On how to Use sp Flash Tool

Recommended:

Learn How to Flash Mediatek device From Here
Download more Mediatek Firmware from here

Archos 80b Xenon Stock ROM / Firmware 

Firmware Info:
id:KOT49H
version:4.4.2
model:Archos 80b Xenon
manufacturer:archos
brand:archos
manufacturer:archos
model:Archos 80b Xenon
Archos 80b Xenon__ac80bxe__4.4.2__ALPS.KK1.MP1.V2.11
MT6582

Live by Night

Ben Affleck is back behind the camera for a star-studded adaptation of the Dennis Lehane novel of the same name. Set in the Prohibition Era, the movie centers around a group of individuals and their dealings in the world of organized crime.

You Kill Me

This is the story of a man while drying out on the West Coast, an alcoholic hit man befriends a tart-tongued woman who might just come in handy when it's time for him to return to Buffalo and settle some old scores.

Download SP Flash Tool V5.1648.00.000 Latest Version


SP flash tool is a smart and user friendly tool designed for MediaTek devices. Android Smartphone Flash tool supports flash stock, installing custom recovery and firmware updates. SPFlash tool is very supportive when you Flash stock ROM,unbrick or installing custom recovery for your Mediatek devices.

If you are using the scatter SP Flash is very much easy to use with CWM and appropriate software and driver installation. Download Smart Phone Flash Tool for Windows and Linux OS. SmartPhone Flash tool is for MTK devices,compatible with both 32 and 64 bit version.

Recommended:
HOW TO USE SP FLASH TOOL
DOWNLOAD MTK STOCK ROM

SP Flash Latest Change Logs [V5.1648.00.000]
Flash custom ROM
Android stock ROM flashing (Scatter based)
Fixes bricked devices
Advanced testing and verifying memory
Reset, format and erase MTK device
Write, read parameters etc.

Requirements For SP FlashTool
Pc or Laptop
USB data cable for your device
Drivers (MediaTek USB VCOM drivers ). You can see above tutorial and download links
Scatter file + files to be flashed


SP Flash Tool Features.

Flash Stock Rom:
It allows you to flash scatter based firmware on android device (MTK based). It also allows you to downgrade or upgrade your device firmware in few clicks.
Flash Recovery:
It allows you to flash custom recovery to your MTK based device. Simply, add the scatter file in the SP Flash tool and locate the recovery.img image and flash it.
Memory Test:
It allows users to check and verify the RAM on external memory and the NAND Flash on the device.
Parameter Setting:
It allows users to read and write the parameter on device devices. For Example, users can easily read and write functions data for One time programming (OTP) area.
Format Device / Hard Reset:
It allows users to format Android Smartphone running on the MediaTek Chipset. Simply load the Scatter file and connect your smartphone to the computer and press on Format.

Download SP Flash Tool V5.1648.00.000 Latest  Version 2017
SP_Flash_Tool_exe_Windows_v5.1648.00.000

Download Samsung ADB ENABLE FILES [ 2017 FRP SOLUTION ]

How to Remove SAMSUNG FRP via ADB Command

What is FRP?
Factory Reset Protection (FRP) is a security method that was designed to make sure someone can't just wipe and factory reset your phone if you've lost it or it was stolen. Starting with Android Lollipop, FRP is "standard" in vanilla Android, and most companies making our phones have implemented it in their own models.


Recommended:


How to Remove SAMSUNG FRP via ADB Command

Download ADB Enable Files Below
 this files is .tar file extension so Flash uisng Odin Tool
learn how to flash Samsung .tar file from here
After downloaded, Now yours Mobile ADB Enabled 
You can now RUN the follow Commands through ADB Terminal.

adb shell content insert --uri content://settings/secure --bind name:s:user_setup_complete --bind value:s:1
Note: if this commands Not work for you Try below commands

adb shell am start -n com.google.android.gsf.login.LoginActivity
adb shell am start -n com.google.android.gsf.login/

Congratulation You have Successfully Removed FRP using ADB Terminal . If all commands not working then comment on this post. I will give you any other solution for removing your FRP.

Download Samsung ADB ENABLE FILES


Samsung Galaxy A7 A710Y ADB Enable file


Samsung Galaxy A9 A910F ADB Enable File 


Samsung Galaxy Metro SM-B350E ADB Eanble File


Samsung Galaxy G120F SM-G120F ADB Enable File


Samsung Galaxy A3 SM-A310F ADB Enable FIle 


Samsung Galaxy A5 SM-A510F ADB Enable File


Samsung Galaxy A510Y ADB Enable File


Samsung Galaxy A7 SM-A710F ADB Enable FIle


Samsung Galaxy Xcover 3 SM-G398F ADB Enable File


Samsung Galaxy G510G SM-G510G ADb Enable File


Samsung Galaxy On7 SM-G600F ADB Enable File 


Samsung Galaxy S5 Neo SM-G903F ADB Enable FIle


Samsung Galaxy S6 SM-G920P ADB Enable File


Samsung Galaxy S6 Edge+ SM-G928F ADb Enable File


Samsung Galaxy S6 Edge+ SM-G928G ADb Enable File


Samsung Galaxy S7 SM-G930F ADB Enable File


Samsung Galaxy S7 Edge SM-G935F ADB Enable File


Samsung Galaxy J1 NXT SM-J105 ADB Enable File


Samsung Galaxy J1 Mini SM-J105H ADB Enable File


Samsung Galaxy J1 (2016) SM-J120F ADB Enable File


Samsung Galaxy J2 SM-J200H ADB Enable File 


Samsung Galaxy J5 (2016) SM-J510H ADB Enable File


Samsung Galaxy J7 SM-J700H ADB Enable File


SAMSUNG Galaxy Tab A (2016) 4G SM-T585 ADB Enable File

SAMSUNG Galaxy T677D SM-T677D ADB Enable File


SAMSUNG Galaxy Tab S2 SM-T813 ADB Enable File


Samsung Galaxy J3 (2016) SM-J320F ADB Enable File


Samsung Galaxy J3 (2016) SM-J320P ADB Enable File


Samsung Galaxy J3 (2016) SM-J320Y ADB Enable File


Samsung Galaxy J5 (2016) SM-J510F ADB Enable File


SAMSUNG Galaxy Tab S2 VE SM-T819 ADb Enable File


Samsung Galaxy J7 (2016) SM-J710F ADB Enable FIle


Samsung Galaxy J7 (2016) SM-J710G ADB Enable File


SAMSUNG Galaxy Note 7 SM-N930F ADB Enable File


SAMSUNG Galaxy Gear Fit SM-R350 ADB Enable File


SAMSUNG Galaxy SAMSUNG Galaxy Tab A (2016) SM-T580 ADB Enable File


HOW TO FIX / REPAIR BASEBAND UNKNOWN + IMEI TECNO CAMON C9


With this easy tutorial you can Fix Baseband Unknown + Invalid imei without stress on Tecno Camon C9
What is imei ?
The IMEI (International Mobile Equipment Identity) is a unique number to identify GSM, WCDMA, and iDEN mobile phones, as well as some satellite phones. TheIMEI is only used for identifying the device and has no permanent or semi-permanent relation to the subscriber.


This Method Also works on follow Phones.,

INFINIX X601
INFINIX X552
INFINIX X553
INFINIX X554
INFINIX X556
INFINIX X557
INFINIX X600
INFINIX X601
TECNO C9
TECNO C7
TECNO PHATOM 6 PLUS
TECNO W4
TECNO W3
TECNO W5
TECNO W2
TECNO J8
TECNO L6
TECNO C7
GIONEE 
E.T.C.

HOW TO FIX / REPAIR BASEBAND UNKNOWN + IMEI TECNO CAMON C9
Steps:


  • Download an Flash Tecno Camon C9 Stock ROM from here
  • After flash successful
  • Make A Factory Reset In Settings=>
  • Open Miracle Box Tick On Fix Unknown Baseband download miracle box From here [optional] 
screenshot below


  • After fixed, Remove the battery and reboot the phone {1st boot takes While]
  •  Finally Goto settings=>  Again and make A Factory Reset.Done.

Underworld blood wars

Vampire death dealer, Selene (Kate Beckinsale) fights to end the eternal war between the Lycan clan and the Vampire faction that betrayed her.

Assassin Creed

base onf a true Muslim killing base when islamis try to kill suni with there power one man fight against the leader of Muslim for a long time less ... after this this procedure which is call assassination become popular and many of movies and many games where introduce ever after .....
Origin: USA, UK, France
Year: 2016
Directors: Justin Kurzel
Genres: Action, Adventure, History, Sci-Fi
Stars: Michael Fassbender, Marion Cotillard, Jeremy Irons, Brendan Gleeson, Michael Kenneth Williams
When Callum Lynch
Watch in SD

Download SOLO Aspire 3 Firmware

SOLO Aspire 3 Firmware


Below is the direct link to download the Solo Aspire 3 Firmware stock ROM (flash file) this Firmware contains Flash Tool, Driver and instructions.
Take a Backup of your personal data before flashing or installing the firmware on your smartphone.
As this helps you to recover the personal data whenever any thing wrong happen.

SOLO Aspire 3 Firmware Specifications. File To Flash [ stock ROM]

Technology
GSM: GSM 850 / 900 / 1800 / 1900
3G: HSDPA 850 / 2100
4G: No
SIM Type: Micro SIM

OS:
 Android 5.1 Lollipop
Design
Dimensions: 144.3 x 73.1 x 9.8 mm

Weight:
Display: 5.0 inches, 540 x 960 pixels, IPS display
Sensors: Accelerometer, Proximity
Build: Plastic
Colours: Warm Silver. Soft Gold.

Hardware
Processor Type: Quad-core 1.2 GHz Cortex-A53
Processor Name: Qualcomm MSM8916 Snapdragon 410
Graphics Processor:
RAM: 1 GB
Internal Storage: 8 GB
External Storage: MicroSD card up to 32 GB

Camera
Rear: 8 megapixel autofocus camera with LED flash
Video recording: Yes
Front-facing: 5 megapixel camera

Multimedia
Music Support: mp3, aac, aac+, eaac+, amr
Loudspeaker: Mono
Video Support: mpeg4, h.263, h.264
FM Radio:
SOLO Music/SOLO View: Unlimited access to 20,000+ songs and movies

Connectivity
Bluetooth: Yes
WiFi: Wi-Fi 802.11 b/g/n, Wi-Fi Direct, hotspot
GPS: Yes
USB: microUSB
Miscellaneous
Battery: 2000 mAh


You Might Also Like:

All Solo Firmware Link here
Download SP flash Tool From here
Download Spreadtrum Flashing Tool from Here

HOW TO FLASH SOLO ASPIRE 3?

Download and extract the stock firmware on your computer.
After extracting you will find the SP Flash Tool, Driver and instruction manual.
Install the USB Drivers (skip if drivers are already installed).
Open the SP Flash Tool and load the Scatter File from the firmware folder.
Connect your Smartphone to the computer using the USB Driver.
Click on Upgrade / Download Button in the SP Flash Tool to Begin the Flashing.
Green Ring will appear at the end of successful Flash.
See Detailed instruction with images On how to Use sp Flash Tool

Recommended:
Learn How to Flash Mediatek device From Here
Download more Mediatek Firmware from here

SOLO Aspire 3 Firmware  / Stock ROM
Aspire3.fwvga.64+8.b1b8_app_V004_20161031
Android 6.0
MT6580

Intex Aqua i3 Stock ROM Firmware (Flash File) Download

Intex Android Stock ROM Firmware Flash File

Here is a Intex Aqua i3 Stock ROM Firmware which can be used to load and flash stock firmware on any Intex Aqua i3 of this exact variant. Any MTK Flash tools can download and flash this Intex Aqua i3 flash file on your Aqua i3 so long as that MTK Flash Tool supports MTK Scatter File.


Since most major software malfunctions on any MTK Android devices can only be corrected by flashing, this Aqua i3 flash file, if Miniperly used, can unbrick (debrick) your Aqua i3 and also corrects any software issues your Intex Aqua i3 may currently have. Also, keep in mind that when you load stock firmware on your Intex Aqua i3 using any MTK flash tool, your Intex Aqua i3 will be reset to factory defaults settings and by that, definately, your UserData will be lost including contacts, messages and others.


Note: If your Aqua i3 is already bricked and you want to unbrick it, you will need to pay closer attention to the tutorials contained below here.


Intex Aqua i3 Stock ROM Firmware Download Link(s)

1. Intex Aqua i3 K (v03 India SER (0410) NLCD) Stock ROM

2. Intex Aqua i3 (v05) Stock ROM

3. Intex Aqua i3 K (v07) Stock ROM


How to Flash Stock Firmware On Intex Aqua i3

1. Download your Intex Aqua i3 stock ROM firmware from the link above.


2. Extract the Intex Aqua i3 Firmware you downloaded from the link above onto a folder on your PC.


3. Download and install MTK android device drivers on your PC. You may skip this step if you have installed MTK drivers on your PC already otherwise, download MTK drivers here


4. Now, choose either of the tools listed below here to load the stock firmware on your Intex Aqua i3 .


See video tutorial here: How to Flash MTK Android Devices Video Tutorial


Note

1. Each of the tools listed above contained step by step guides with illustrated pictures on how to flash stock firmware on your Intex Aqua i3 .

2. If your device is bricked already, I recommend that you use NCK Box or SP Flash. Both are the safest toolS for flashing MTK Android devices.

3. If you require any further assistance, simply drop your comment detailing the issue(s) and I shall help you revive your Intex Aqua i3 , if need be.

How to Hard Reset (Wipe or Format) Xiaomi Mi 4 LTE

More often than not, you will need to wipe, factory reset or format your Xiaomi Mi 4 LTE when you forget the password, pattern lock or any other security barriers you may have set on your Mi 4 LTE to prevent unauthorised third-party access to your device.

It may also be necessary that you format, factory reset or wipe your Xiaomi Mi 4 LTE especially, when you notice a sudden change in your Xiaomi Mi 4 LTE performances in terms of its speed or level of applications deficiency.


Factory Reset Mi 4 LTE

Here, I discuss the step by step procedures involved in wiping, factory reset or formatting your Xiaomi Mi 4 LTE. NOTE: I- the methods discussed herein will erase all the data on your Xiaomi Mi 4 LTE, therefore, if need be, you should backup every necessary data on your Xiaomi Mi 4 LTE before you proceed. II- Your Xiaomi Mi 4 LTE may also end up getting stuck at FRP. FRP Lock which is an acronym for Factory Reset Protcetion is a security meansure that restricts access to your android device following a factory reset, hard reset or wipe.


How to Factory Reset your Xiaomi Mi 4 LTE

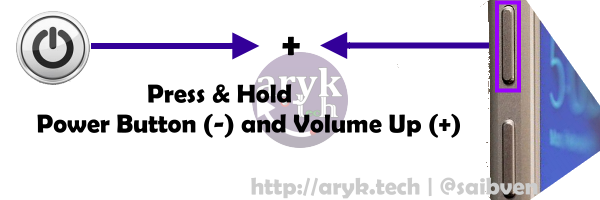
1. Power off your Xiaomi Mi 4 LTE. You may do this by pressing and holding the Power Button. If the battery can be removed by you, then; that's your best means.

Factory Reset Mi 4 LTE -Step 1

2. Now, press and hold Volume Up (+) and Power Button for few seconds or until Xiaomi logo appears on your Mi 4 LTE screen.

Factory Reset Mi 4 LTE -Step 2

3. As soon as Mi Logo appears on your Mi 4 LTE screen, release both keys that were held down in Step 2 above.

4. Using Volume Keys to navigate, select ENGLISH (or, your prefered language) and use Power Key to make your selection.

5. Scroll to Wipe Reset and select it. Confirm your selection.

6. Scroll down to select Wipe All Data.

7. Now, confirm the whole process by scrolling to YES and select it.

8. You may now wait patiently for your Xiaomi Mi 4 LTE to initialize and complete the Factory Reset/Data Wipe Operation.


NOTE:

1. At the Step 3, you may release ONLY the POWER KEY and continue pressing the VOLUME UP (+) KEY until Xiaomi Mi recovery screen shows up.


How to Format (Wipe) your Xiaomi Mi 4 LTE: Method 2

1. If your Xiaomi Mi 4 LTE is Switched off, begin by Switching On the phone.

Format Wipe Mi 4 LTE -Step 1

2. From your Xiaomi Mi 4 LTE go to Settings > Backup & Reset.

3. Tap Factory Data Reset then, select Reset Device.

4. Choose Erase Everything. Be sure that all the data on your Xiaomi Mi 4 LTE will be erased/formatted following this step.

5. Select OK to confirm the whole process.

6. Now, wait patiently while your Xiaomi Mi 4 LTE initializes and performs the Data Wipe (Factory Reset) operation until it is completed.

When the whole process is complete, your Xiaomi Mi 4 LTE will be rebooted hence, your Xiaomi Mi 4 LTE has been reseted to factory defaults settings and you are now welcomed by the brand new Mi 4 LTE.


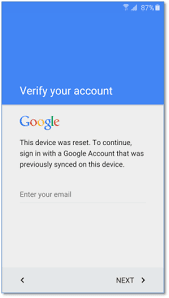
If after wiping or formating your Mi 4 LTE, you still encounter issues or find yourself at FRP Lock screen, you could use these tutorials to help yourself out.

Karbonn Titanium X Stock ROM Firmware (Flash File) Download

Karbonn Android Stock ROM Firmware Flash File

Here is a Karbonn Titanium X Stock ROM Firmware which can be used to load and flash stock firmware on any Karbonn Titanium X of this exact variant. Any MTK Flash tools can download and flash this Karbonn Titanium X flash file on your Titanium X so long as that MTK Flash Tool supports MTK Scatter File.


Since most major software malfunctions on any MTK Android devices can only be corrected by flashing, this Titanium X flash file, if properly used, can unbrick (debrick) your Titanium X and also corrects any software issues your Karbonn Titanium X may currently have. Also, keep in mind that when you load stock firmware on your Karbonn Titanium X using any MTK flash tool, your Karbonn Titanium X will be reset to factory defaults settings and by that, definately, your UserData will be lost including contacts, messages and others.


Note: If your Titanium X is already bricked and you want to unbrick it, you will need to pay closer attention to the tutorials contained below here.


Karbonn Titanium X Stock ROM Firmware Download Link(s)

1. Karbonn Titanium X (208 091113) Stock ROM


How to Flash Stock Firmware On Karbonn Titanium X

1. Download your Karbonn Titanium X stock ROM firmware from the link above.


2. Extract the Karbonn Titanium X Firmware you downloaded from the link above onto a folder on your PC.


3. Download and install MTK android device drivers on your PC. You may skip this step if you have installed MTK drivers on your PC already otherwise, download MTK drivers here


4. Now, choose either of the tools listed below here to load the stock firmware on your Karbonn Titanium X .


See video tutorial here: How to Flash MTK Android Devices Video Tutorial


Note

1. Each of the tools listed above contained step by step guides with illustrated pictures on how to flash stock firmware on your Karbonn Titanium X .

2. If your device is bricked already, I recommend that you use NCK Box or SP Flash. Both are the safest toolS for flashing MTK Android devices.

3. If you require any further assistance, simply drop your comment detailing the issue(s) and I shall help you revive your Karbonn Titanium X , if need be.

How to Hard Reset (Wipe or Format) Xiaomi Redmi 2

More often than not, you will need to wipe, factory reset or format your Xiaomi Redmi 2 when you forget the password, pattern lock or any other security barriers you may have set on your Redmi 2 to prevent unauthorised third-party access to your device.

It may also be necessary that you format, factory reset or wipe your Xiaomi Redmi 2 especially, when you notice a sudden change in your Xiaomi Redmi 2 performances in terms of its speed or level of applications deficiency.


Factory Reset Redmi 2

Here, I discuss the step by step procedures involved in wiping, factory reset or formatting your Xiaomi Redmi 2. NOTE: I- the methods discussed herein will erase all the data on your Xiaomi Redmi 2, therefore, if need be, you should backup every necessary data on your Xiaomi Redmi 2 before you proceed. II- Your Xiaomi Redmi 2 may also end up getting stuck at FRP. FRP Lock which is an acronym for Factory Reset Protcetion is a security meansure that restricts access to your android device following a factory reset, hard reset or wipe.


How to Factory Reset your Xiaomi Redmi 2

1. Power off your Xiaomi Redmi 2. You may do this by pressing and holding the Power Button. If the battery can be removed by you, then; that's your best means.

Factory Reset Redmi 2 -Step 1

2. Now, press and hold Volume Up (+) and Power Button for few seconds or until Xiaomi logo appears on your Redmi 2 screen.

Factory Reset Redmi 2 -Step 2

3. As soon as Mi Logo appears on your Redmi 2 screen, release both keys that were held down in Step 2 above.

4. Using Volume Keys to navigate, select ENGLISH (or, your prefered language) and use Power Key to make your selection.

5. Scroll to Wipe Reset and select it. Confirm your selection.

6. Scroll down to select Wipe All Data.

7. Now, confirm the whole process by scrolling to YES and select it.

8. You may now wait patiently for your Xiaomi Redmi 2 to initialize and complete the Factory Reset/Data Wipe Operation.


NOTE:

1. At the Step 3, you may release ONLY the POWER KEY and continue pressing the VOLUME UP (+) KEY until Xiaomi Mi recovery screen shows up.


How to Format (Wipe) your Xiaomi Redmi 2: Method 2

1. If your Xiaomi Redmi 2 is Switched off, begin by Switching On the phone.

Format Wipe Redmi 2 -Step 1

2. From your Xiaomi Redmi 2 go to Settings > Backup & Reset.

3. Tap Factory Data Reset then, select Reset Device.

4. Choose Erase Everything. Be sure that all the data on your Xiaomi Redmi 2 will be erased/formatted following this step.

5. Select OK to confirm the whole process.

6. Now, wait patiently while your Xiaomi Redmi 2 initializes and performs the Data Wipe (Factory Reset) operation until it is completed.

When the whole process is complete, your Xiaomi Redmi 2 will be rebooted hence, your Xiaomi Redmi 2 has been reseted to factory defaults settings and you are now welcomed by the brand new Redmi 2.


If after wiping or formating your Redmi 2, you still encounter issues or find yourself at FRP Lock screen, you could use these tutorials to help yourself out.

Intex Aqua N15 Stock ROM Firmware (Flash File) Download

Intex Android Stock ROM Firmware Flash File

Here is a Intex Aqua N15 Stock ROM Firmware which can be used to load and flash stock firmware on any Intex Aqua N15 of this exact variant. Any MTK Flash tools can download and flash this Intex Aqua N15 flash file on your Aqua N15 so long as that MTK Flash Tool supports MTK Scatter File.


Since most major software malfunctions on any MTK Android devices can only be corrected by flashing, this Aqua N15 flash file, if Miniperly used, can unbrick (debrick) your Aqua N15 and also corrects any software issues your Intex Aqua N15 may currently have. Also, keep in mind that when you load stock firmware on your Intex Aqua N15 using any MTK flash tool, your Intex Aqua N15 will be reset to factory defaults settings and by that, definately, your UserData will be lost including contacts, messages and others.


Note: If your Aqua N15 is already bricked and you want to unbrick it, you will need to pay closer attention to the tutorials contained below here.


Intex Aqua N15 Stock ROM Firmware Download Link(s)

1. Intex Aqua N15 (v08) Stock ROM


How to Flash Stock Firmware On Intex Aqua N15

1. Download your Intex Aqua N15 stock ROM firmware from the link above.


2. Extract the Intex Aqua N15 Firmware you downloaded from the link above onto a folder on your PC.


3. Download and install MTK android device drivers on your PC. You may skip this step if you have installed MTK drivers on your PC already otherwise, download MTK drivers here


4. Now, choose either of the tools listed below here to load the stock firmware on your Intex Aqua N15 .


See video tutorial here: How to Flash MTK Android Devices Video Tutorial


Note

1. Each of the tools listed above contained step by step guides with illustrated pictures on how to flash stock firmware on your Intex Aqua N15 .

2. If your device is bricked already, I recommend that you use NCK Box or SP Flash. Both are the safest toolS for flashing MTK Android devices.

3. If you require any further assistance, simply drop your comment detailing the issue(s) and I shall help you revive your Intex Aqua N15 , if need be.

How to Hard Reset (Wipe or Format) Xiaomi Redmi 2A

More often than not, you will need to wipe, factory reset or format your Xiaomi Redmi 2A when you forget the password, pattern lock or any other security barriers you may have set on your Redmi 2A to prevent unauthorised third-party access to your device.

It may also be necessary that you format, factory reset or wipe your Xiaomi Redmi 2A especially, when you notice a sudden change in your Xiaomi Redmi 2A performances in terms of its speed or level of applications deficiency.


Factory Reset Redmi 2A

Here, I discuss the step by step procedures involved in wiping, factory reset or formatting your Xiaomi Redmi 2A. NOTE: I- the methods discussed herein will erase all the data on your Xiaomi Redmi 2A, therefore, if need be, you should backup every necessary data on your Xiaomi Redmi 2A before you proceed. II- Your Xiaomi Redmi 2A may also end up getting stuck at FRP. FRP Lock which is an acronym for Factory Reset Protcetion is a security meansure that restricts access to your android device following a factory reset, hard reset or wipe.


How to Factory Reset your Xiaomi Redmi 2A

1. Power off your Xiaomi Redmi 2A. You may do this by pressing and holding the Power Button. If the battery can be removed by you, then; that's your best means.

Factory Reset Redmi 2A -Step 1

2. Now, press and hold Volume Up (+) and Power Button for few seconds or until Xiaomi logo appears on your Redmi 2A screen.

Factory Reset Redmi 2A -Step 2

3. As soon as Mi Logo appears on your Redmi 2A screen, release both keys that were held down in Step 2 above.

4. Using Volume Keys to navigate, select ENGLISH (or, your prefered language) and use Power Key to make your selection.

5. Scroll to Wipe Reset and select it. Confirm your selection.

6. Scroll down to select Wipe All Data.

7. Now, confirm the whole process by scrolling to YES and select it.

8. You may now wait patiently for your Xiaomi Redmi 2A to initialize and complete the Factory Reset/Data Wipe Operation.


NOTE:

1. At the Step 3, you may release ONLY the POWER KEY and continue pressing the VOLUME UP (+) KEY until Xiaomi Mi recovery screen shows up.


How to Format (Wipe) your Xiaomi Redmi 2A: Method 2

1. If your Xiaomi Redmi 2A is Switched off, begin by Switching On the phone.

Format Wipe Redmi 2A -Step 1

2. From your Xiaomi Redmi 2A go to Settings > Backup & Reset.

3. Tap Factory Data Reset then, select Reset Device.

4. Choose Erase Everything. Be sure that all the data on your Xiaomi Redmi 2A will be erased/formatted following this step.

5. Select OK to confirm the whole process.

6. Now, wait patiently while your Xiaomi Redmi 2A initializes and performs the Data Wipe (Factory Reset) operation until it is completed.

When the whole process is complete, your Xiaomi Redmi 2A will be rebooted hence, your Xiaomi Redmi 2A has been reseted to factory defaults settings and you are now welcomed by the brand new Redmi 2A.


If after wiping or formating your Redmi 2A, you still encounter issues or find yourself at FRP Lock screen, you could use these tutorials to help yourself out.

Karbonn Titanium S203 Stock ROM Firmware (Flash File) Download

Karbonn Android Stock ROM Firmware Flash File

To flash your Karbonn Titanium S203, you need to download the Karbonn Titanium S203 stock ROM whose download link is enclosed within here, then, follow the step by step instructions below to flash stock firmware on your Karbonn Titanium S203.

Please note that flashing this Stock ROM Firmware on your Karbonn Titanium S203 will format and restore your device to factory defaults settings, hence, making you loose all the files therein. Therefore, you are advised to make a backup if you need to retain your files and data.


Note: If your Titanium S203 is already bricked and you want to unbrick it, you will need to pay closer attention to the tutorials contained below here.


Karbonn Titanium S203 Stock ROM Firmware Download Link(s)

1. Karbonn Titanium S203 (SW08 20150521) Stock Firmware


How to Flash Stock Firmware On Karbonn Titanium S203

1. Download your Karbonn Titanium S203 stock ROM firmware from the link above.


2. Extract the Karbonn Titanium S203 Firmware you downloaded from the link above onto a folder on your PC.


3. Download and install Spreadtrum android device drivers on your PC. You may skip this step if you have installed spreadtrum drivers on your PC already otherwise, download SPD drivers from here


4. Now, choose either of the tools listed below here to load the stock firmware on your Karbonn Titanium S203.


Note

1. Each of the tools listed above contained step by step guides with illustrated pictures on how to flash stock firmware on your Karbonn Titanium S203.

2. If you require any further assistance, simply drop your comment detailing the issue(s) and I shall help you revive your Karbonn Titanium S203, if need be.

How to Hard Reset (Wipe or Format) Xiaomi Mi Note

More often than not, you will need to wipe, factory reset or format your Xiaomi Mi Note when you forget the password, pattern lock or any other security barriers you may have set on your Mi Note to prevent unauthorised third-party access to your device.

It may also be necessary that you format, factory reset or wipe your Xiaomi Mi Note especially, when you notice a sudden change in your Xiaomi Mi Note performances in terms of its speed or level of applications deficiency.


Factory Reset Mi Note

Here, I discuss the step by step procedures involved in wiping, factory reset or formatting your Xiaomi Mi Note. NOTE: I- the methods discussed herein will erase all the data on your Xiaomi Mi Note, therefore, if need be, you should backup every necessary data on your Xiaomi Mi Note before you proceed. II- Your Xiaomi Mi Note may also end up getting stuck at FRP. FRP Lock which is an acronym for Factory Reset Protcetion is a security meansure that restricts access to your android device following a factory reset, hard reset or wipe.


How to Factory Reset your Xiaomi Mi Note

1. Power off your Xiaomi Mi Note. You may do this by pressing and holding the Power Button. If the battery can be removed by you, then; that's your best means.

Factory Reset Mi Note -Step 1

2. Now, press and hold Volume Up (+) and Power Button for few seconds or until Xiaomi logo appears on your Mi Note screen.

Factory Reset Mi Note -Step 2

3. As soon as Mi Logo appears on your Mi Note screen, release both keys that were held down in Step 2 above.

4. Using Volume Keys to navigate, select ENGLISH (or, your prefered language) and use Power Key to make your selection.

5. Scroll to Wipe Reset and select it. Confirm your selection.

6. Scroll down to select Wipe All Data.

7. Now, confirm the whole process by scrolling to YES and select it.

8. You may now wait patiently for your Xiaomi Mi Note to initialize and complete the Factory Reset/Data Wipe Operation.


NOTE:

1. At the Step 3, you may release ONLY the POWER KEY and continue pressing the VOLUME UP (+) KEY until Xiaomi Mi recovery screen shows up.


How to Format (Wipe) your Xiaomi Mi Note: Method 2

1. If your Xiaomi Mi Note is Switched off, begin by Switching On the phone.

Format Wipe Mi Note -Step 1

2. From your Xiaomi Mi Note go to Settings > Backup & Reset.

3. Tap Factory Data Reset then, select Reset Device.

4. Choose Erase Everything. Be sure that all the data on your Xiaomi Mi Note will be erased/formatted following this step.

5. Select OK to confirm the whole process.

6. Now, wait patiently while your Xiaomi Mi Note initializes and performs the Data Wipe (Factory Reset) operation until it is completed.

When the whole process is complete, your Xiaomi Mi Note will be rebooted hence, your Xiaomi Mi Note has been reseted to factory defaults settings and you are now welcomed by the brand new Mi Note.


If after wiping or formating your Mi Note, you still encounter issues or find yourself at FRP Lock screen, you could use these tutorials to help yourself out.